

How To Install Hp 8600 Printer
Z7_3054ICK0KGTE30AQO5O3KA30N0
hp-concentra-wrapper-portlet
![]() Actions
Actions
HP OfficeJet 8600 Printers - First Fourth dimension Printer Setup
This document is for the following printers:
| HP OfficeJet 8600 Serial Printer | HP Officejet Pro 8610 e-All-in-One Printer | HP Officejet Pro 8625 east-All-in-1 Printer |
| HP Officejet Pro 8600 e-All-in-Ane Printer | HP Officejet Pro 8615 e-All-in-One Printer | HP Officejet Pro 8630 e-All-in-1 Printer |
| HP Officejet Pro 8600 Plus e-All-in-One Printer | HP Officejet Pro 8616 e-All-in-I Printer | HP Officejet Pro 8640 due east-All-in-One Printer |
| HP Officejet Pro 8600 Premium eastward-All-in-One | HP Officejet Pro 8620 e-All-in-One Printer | HP Officejet Pro 8660 e-All-in-One Printer |
To set a printer for the first time, remove the printer and all packing materials from the box, connect the power cable, ready command panel preferences, load paper into the input tray, install the ink cartridges, and and so download and install the printer software.
Step 1: Remove the printer from the box
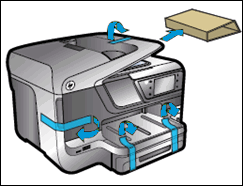
Remove the printer from the box and all tape, stickers, and packing materials from the printer.
The contents might vary by country/region. Meet the packaging for a list of items shipped in the box.
-
Remove the printer from the box.
-
Remove all tape and packing materials from the outside of the printer.
Effigy : Remove the packing materials
-
Remove the sticker on the control panel display.
-
Identify your fingers into the slot on the left side of the printer, and so pull to open the ink cartridge access door.
Figure : Slot on the left side of the printer

-
Remove all record and packing materials from inside the printer.
-
Close the ink cartridge access door.
-
Recycle the packing materials.
Step ii: Install the two-sided press accompaniment (duplexer)
After the printer is unpacked, install the duplexer.
-
Find the duplexer in the box.
-
Accept the duplexer out of its packing fabric, and then remove any tape from the duplexer.
-
Turn the printer so the rear faces you.
-
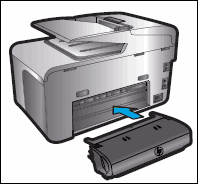
Hold the duplexer by its sides with the rollers toward the printer, insert it into the slot in the rear of the printer, and then push the duplexer into the printer until information technology snaps into place.
note:
Look for the engraved arrows on the duplexer for help positioning it.
Figure : Insert the duplexer
-
Plough the printer back around so the forepart faces you
Footstep 3: Install Tray 2 (optional)
Tray 2 is an optional accessory. If your printer does not include a Tray 2, proceed to the adjacent step.
-
Remove Tray 2 from its box, remove its packing fabric, and and then remove whatever record from the tray.
-
Place the tray on a apartment, level surface where you intend to use the printer.
-
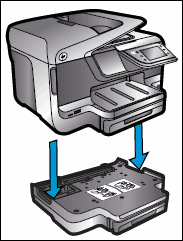
Lift the printer, position it over the top of the paper tray, and so lower the printer on top of the paper tray.
caution:
Keep your fingers and hands articulate of the lesser of the printer.
Effigy : Set the printer on top of Tray 2
-
Make sure the printer is even with the left, right, and back edges of the tray.
Step 4: Connect the power cord and set your preferences
Once you accept installed the duplexer, plug the printer into a power source, plow on the printer, and and so set up your preferences.
note:Do not connect a USB cablevision now. If yous plan to employ a USB cablevision to connect the printer to the reckoner, the installer prompts yous to connect information technology at the correct fourth dimension during the software installation.
-
Connect the power string to the rear of the printer, and and then plug the other finish of the power cord into an electrical outlet.
Effigy : Connect the ability string

-
Turn on the printer.
-
On the printer command panel, touch your preferred language, and so bear upon Proceed to ostend your option.
-
Swipe your finger up and down the display to select your specific country/region, and so impact Continue to confirm your selection.
-
Impact Date and Time, and then swipe your finger upward and down the display to set the month, twenty-four hour period, and year.
-
Touch Done.
Footstep 5: Load paper into Tray ane
Load plain U.S. letter or A4 paper into Tray ane.
-
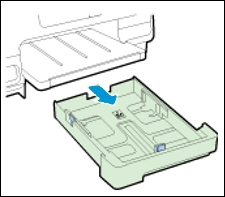
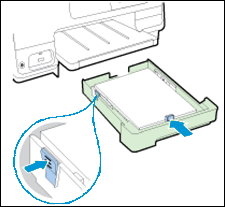
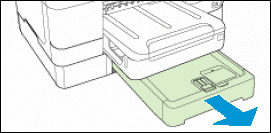
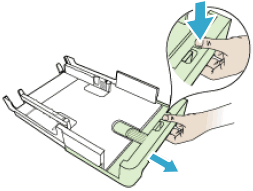
Grasp the underside of Tray 1, and then pull out the tray.
Figure : Pull out the newspaper tray
-
Pinch the paper width guide tabs, and and then slide the paper width guides to their outermost positions.
Figure : Slide out the newspaper width guides
-
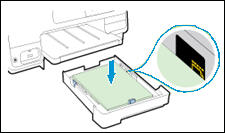
Insert obviously white newspaper in the tray. Make sure that the impress side is face-downward and the short edge is forrard.
caution:
Do not fill the newspaper above the yellow, dotted lines on the sides of the paper tray.
Figure : Load paper into the paper tray
-
If necessary, slide the paper width guides inward then that they rest on the edges of the paper.
-
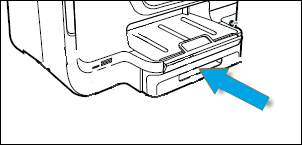
Button the tray toward the printer until it locks into place.
Effigy : Push in the paper tray
-
Pull out the output tray extender, and then raise the paper catch.
Figure : Pull out the tray extender

Pace 6: Load paper into Tray 2 (optional)
If you have Tray ii, you tin load paper into the tray. If your printer does non include a Tray 2, proceed to the adjacent pace.
-
Grasp the underside of Tray 2, and so pull out the tray.
Figure : Pull out Tray 2
-
Slide out the newspaper width guides to their outermost positions.
Figure : Slide out the paper width guides in paper Tray 2
-
Insert a stack of patently white paper in the center of the tray. Make sure that the print side is downward.
circumspection:
Do not fill the paper to a higher place the scarlet lines on the gauges on the sides of the tray.
-
Slide in the paper guides and so that they rest against the edges of the paper.
Effigy : Slide in the newspaper width guides for paper Tray ii

-
Gently reinsert the tray into the printer.
-
Pull out the output tray extender, and and then heighten the paper take hold of.
Figure : Pull out the tray extender
Stride 7: Install the SETUP ink cartridges
Install the HP SETUP ink cartridges that came in the box with your printer.
caution:You must install the SETUP ink cartridges when offset setting up the printer, or an ink cartridge fault occurs.
-
Identify your fingers into the slot on the left side of the printer, and so pull to open the ink cartridge access door.
Effigy : Place your fingers in the slot on the left side of the printer
-
Expect until the printer is idle and silent before you continue.
-
Remove the ink cartridge from its package.
note:
Subsequently you remove an ink cartridge from its packet, install information technology right abroad to avoid dissentious the ink.
-
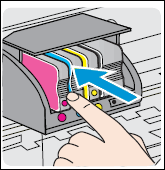
Hold the ink cartridge by its sides with the nozzles toward the printer, insert the ink cartridge into its slot, and then push the ink cartridge forward until it snaps into place.
Figure : Insert the ink cartridge
-
Repeat these steps to install all the new ink cartridges.
-
Close the ink cartridge access door.
-
Look for the printer to align the ink cartridges.
Subsequently the alignment is complete, the printer prints an alignment folio.
note:
If your printer is the HP Officejet 8640, a message displays to use just genuine HP ink cartridges. Touch Yep to have the terms of utilise.
Footstep 8: Install the printer software
Your HP printer hardware is now ready and you can install the printing software. Do not try to connect the printer to a reckoner until instructed to do so in the press software.
Download the latest version of the printing software from the following HP websites:
note:Some of the printers in the list have similar names. Brand sure to select the link side by side to the exact name of your printer.
Step 9: Fix up the printer for fax
Later on yous complete the previous setup steps, use i of the post-obit links to fix the printer to transport and receive faxes.
| Printer model | Link |
| HP Officejet 8600 Series printers HP Officejet Pro 8610 printers HP Officejet Pro 8615 printers HP Officejet Pro 8616 printers HP Officejet Pro 8620 printers HP Officejet Pro 8625 printers HP Officejet Pro 8630 printers HP Officejet Pro 8640 printers HP Officejet Pro 8660 printers | How to Fax |
| HP Officejet Pro 8600 printers HP Officejet Pro 8600 Plus printers HP Officejet Premium 8600 Plus printers | Setting Up the All-in-1 to Send and Receive Faxes |

Source: https://support.hp.com/id-en/document/c04074893
Posted by: peterscoularl.blogspot.com
0 Response to "How To Install Hp 8600 Printer"
Post a Comment